Coding a Discord bot in 2024 with discord.js

The growth of Discord over the last couple of years among the online community has led to a lot of tasks being automated with bots, which help communities boost engagement like never before. The platform has evolved into an ideal place for communities to host events, aid in schoolwork, or simply chat among themselves.
Most people are familiar with how Discord bots can be used to perform a variety of common tasks, such as:
- Moderation. Moderation bots can be used to filter out profanity or spam and perform timeouts or bans accordingly.
- Entertainment bots. Many bots on Discord offer a variety of entertainment such as chat-based games with leaderboards for people to compete with.
- Game stats bots. Being an application enriched with gamers, it's very convenient for users to get stats on different games with just a single command.
- Music/audio bots. Bots that can easily connect to a voice chat and play audio without any extra hassle.
If you're looking to create a Discord bot in javascript, look no more.
Setting up the environment
The first thing we want to do is set up our coding environment before we even create the bot. We are going to need to secure some important variables anyway, so let's set up our files. We are going to need Node.js installed on our machine (The runtime environment for us to execute our javascript code in). It should automatically come with npm (node package manager).
After we create a folder somewhere on our computer, let's open it up in an IDE (I'm using Visual Studio Code) and create a terminal.
npm init
Then, let's install the libraries we need. Discord.js lets us easily interact with the discord API. Dotenv will allow us to store our important environment variables in a file to be used in runtime.
npm install discord.js dotenv --save
You should now create a index.js and a .env file in your root directory if they don't already exist.
Actually creating the bot "account"
The next thing to do is to head over to the Discord Developer Portal - a portal to manage the bot's account and other important features, like the permissions it needs and the bot token. The token here is how the bot is authenticated and must be kept very secure.
The application ID is going to be your bot's ID.
Let's create our initial application:

Head over to your application, and find the application ID. Store this in your .env file. Make sure to not include the angle brackets.
CLIENT_ID=<YOUR-ID-HERE>
In the settings, click on Bot and create the bot account, and add whatever username and avatar you wish. At this point, we can also grab the token. Store this in the .env file as well, on another line. It should look like this now:
CLIENT_ID=<YOUR-ID-HERE>
TOKEN=<YOUR-BOT-TOKEN-HERE>
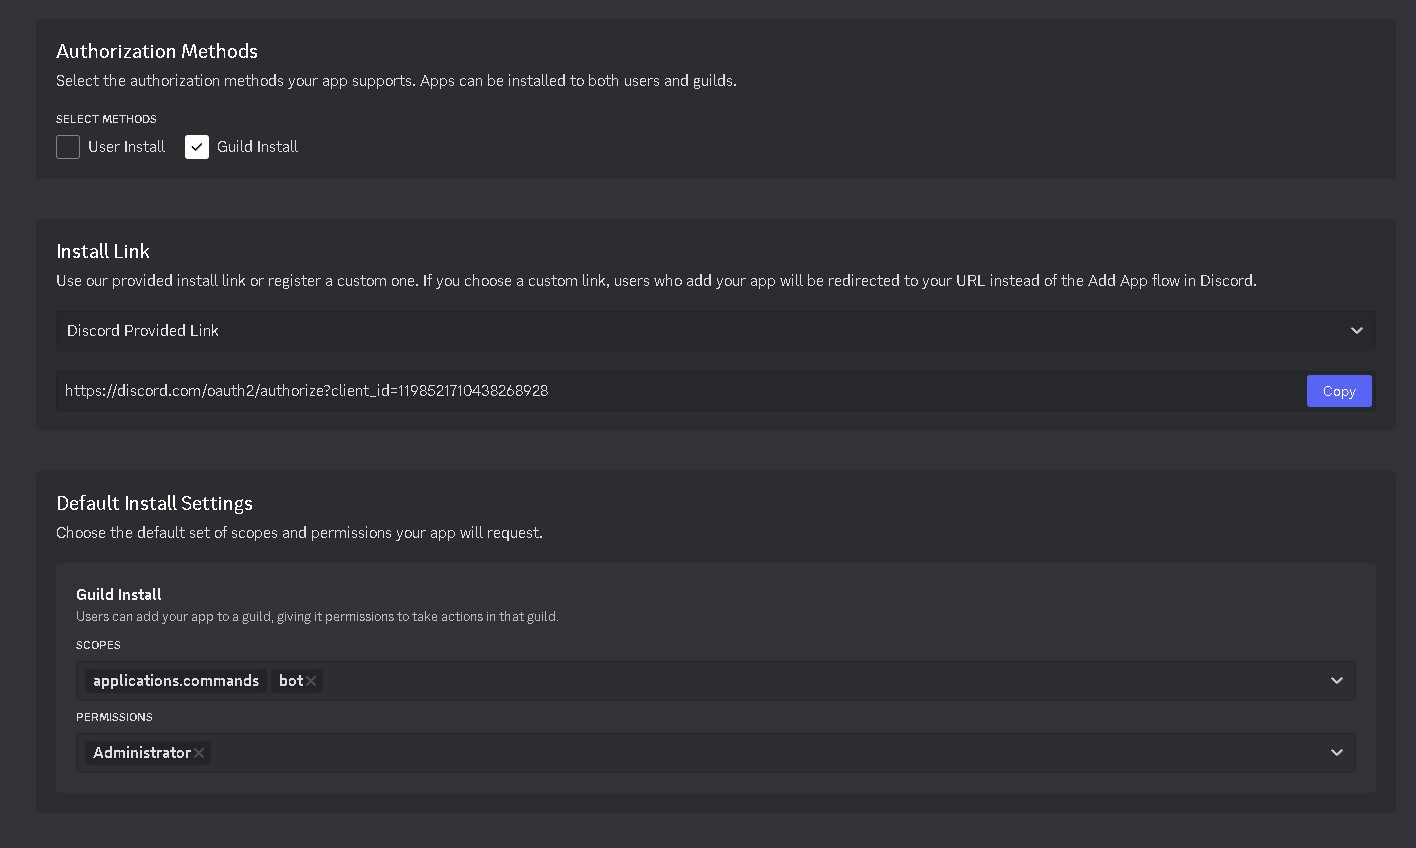
Now, let's add the bot to a server. Head over to Installation, enable the discord provided link and add the bot scope, and then give the bot whatever permissions you want it to have - I'm just going to give it administrator for now.
The link that is generated can be used to add the bot to a server.
Let's code now lol
Alright, this is cool. Let's open our index.js file and start programming a command for our bot.
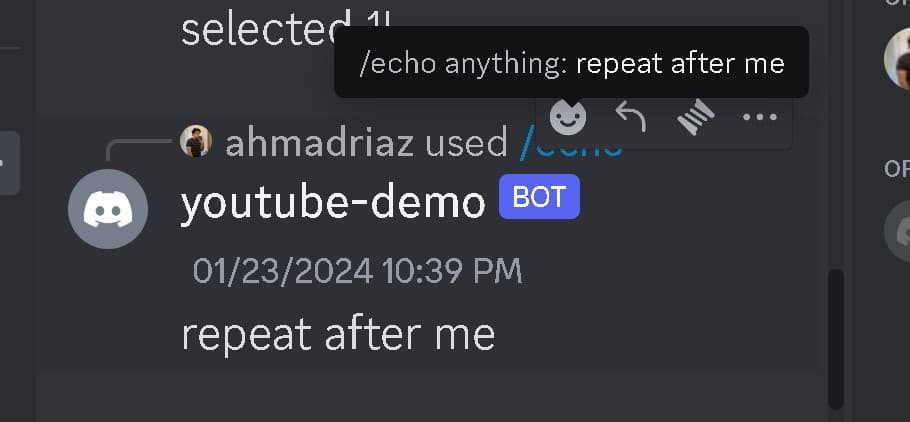
For this tutorial, I will create an application slash command that echoes back whatever the person says. A slash command is a command that is accessed with slashes in Discord, and it allows you to customize it with ease.
Please note: application commands are registered globally. If you wish to have a command for servers ("guilds") only, you will have to use application guild commands instead.
First off, in your package.json, ensure the "type": "module" field exists. If not, add it.
Let's import the necessary modules in the index.js file:
import { Client, GatewayIntentBits, REST, Routes, ApplicationCommandType, ApplicationCommandOptionType, EmbedBuilder } from 'discord.js';
const client = new Client({ intents: [GatewayIntentBits.Guilds, GatewayIntentBits.GuildMessages, GatewayIntentBits.MessageContent] })
import { config } from 'dotenv';

// Please set the bot token and client/application id as TOKEN and CLIENT_ID respectively, in .env
config();
Let's register our bots commands, and then login:
const commands = [
    {
        name: "echo",
        description: "repeat what you said",
        type: ApplicationCommandType.ChatInput,
        options: [{
            name: "anything",
            description: "just type anything",
            type: ApplicationCommandOptionType.String,
            required: true
        }]
    }
]

(async () => {
    const rest = new REST({ version: '10' }).setToken(process.env.TOKEN);
    await rest.put(Routes.applicationCommands(process.env.CLIENT_ID), { body: commands });
    console.log("Successfully set application commands.");

    client.login(process.env.TOKEN);
})();

client.on("ready", () => {
    console.log("Logged in as " + client.user.tag + "!");
});
Ok, great. Now let's add the functionality for the echo slash command. We will listen to the interactionCreate event:
client.on("interactionCreate", async interaction => {
    if (interaction.isChatInputCommand()) {
        switch (interaction.commandName) {
            case "echo":
                await interaction.reply(interaction.options.get("anything").value);
                break;
        }
    }
});
At this point, we can start our bot. In the terminal, run:
node index.js
Now we can use the slash command with our bot. It begins with /echo :
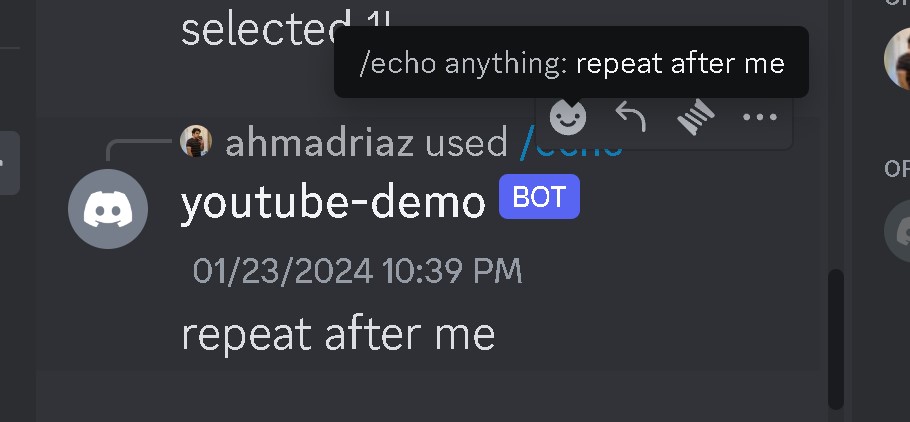
And it works!