Upscaling images with AI
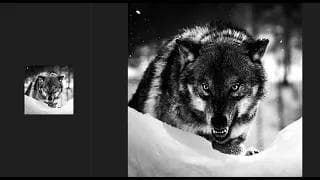

As we step into 2024, the state of technology continues to be transformed by rapid advancements in AI. This has led to various tech giants releasing AI models never seen before, such as generative AI (Stable diffusion and Midjourney, for example). In this tutorial, I’m going to use Real-ESRGAN, which is a tool that can enhance image quality and reduce noise. I’m going to cover the installation, setup, and application of Real-ESRGAN, so that you can discover the potential of AI in image restoration and upscaling with very little effort.
Installation
First and foremost, you’re going to need to install either Anaconda or Miniconda. These are distributions of Python that simplify the process of managing virtual environments and installing packages. Virtual environments are how we keep installed packages program-specific and prevent groundbreaking bugs in the future caused by incompatibility from other program’s dependencies (as python dependencies are global by default). This is not mandatory as all that’s required is the latest python version, but it is heavily recommended.
If you are using a NVIDIA GPU that is compatible with CUDA, I recommend downloading that for faster inference speeds. CUDA allows us to accelerate machine learning by parallel computing on the GPU, but it isn’t required.
The next thing we will need is git installed, so we can download the Real-ESRGAN github repo onto our machine and open it up.
In a terminal, run the following command:
git clone https://github.com/xinntao/Real-ESRGAN.git
cd Real-ESRGAN
You can also download the repo manually from the github here.
Setup
Let’s open a terminal up in our downloaded repo, and run the following commands to install pip and necessary packages:
python -m ensurepip
pip install basicsr
pip install -r requirements.txt
python setup.py develop
Now, we are going to download the different weights (and place them in the weights directory). There is 2x upscale, 4x upscale, another upscaler for anime, and so on. The following commands are for windows, and may look a bit different on linux/macOS.
cd weights
curl -O -L https://github.com/xinntao/Real-ESRGAN/releases/download/v0.1.0/RealESRGAN_x4plus.pth
curl -O -L https://github.com/xinntao/Real-ESRGAN/releases/download/v0.2.1/RealESRGAN_x2plus.pth
curl -O -L https://github.com/xinntao/Real-ESRGAN/releases/download/v0.2.2.4/RealESRGAN_x4plus_anime_6B.pth
Inference
At last, we can actually upscale our images.
Place your images in the input folder. This command will take us back to the root directory and execute the inference script. Replace -n argument with model name (RealESRGAN_x2plus, RealESRGAN_x4plus, RealESRGAN_x4plus_anime_6B, etc).
cd ..
python inference_realesrgan.py -n RealESRGAN_x2plus -i inputs
Results can be found in the results folder.
Conclusion
In conclusion, the rapid advancements in AI models have opened up possibilities for image restoration and improvement that we’ve never seen before. In this tutorial, I covered how to install, setup, and run inference of Real-ESRGAN, barely making a dent in the potential AI has. Hopefully it motivates other people to delve into the world of AI and leverage it to its fullest potential.